How To Use Apple AirDrop To Transfer Files On iPhone, iPad, & Mac
Have you ever found yourself struggling to transfer files between your Apple devices or share documents with friends who also use iPhones, iPads, or Macs? We’ve all been there – desperately emailing ourselves attachments or dealing with clunky cloud services. But thankfully, Apple introduced AirDrop, a game-changing feature that makes transferring files between Apple devices an absolute breeze.
Initially, I wasn’t always on board with the Apple ecosystem. As someone who values flexibility, the idea of being locked into one company’s products turned me off.
However, did AirDrop change my mind? Seeing how seamlessly I could beam files between my iPhone, iPad, and MacBook absolutely sold me.
These days, I’m a big Apple fan – and you’ll understand why after I walk you through how to use Apple AirDrop to transfer files on iPhone, iPad, and Mac. Let’s dive right in, shall we?
How To Set Up Airdrop On Your Apple Device
Before you can start airdropping files between Apple devices, you have to learn how to set up AirDrop on the devices first. How can you do that right? Well, I’ve got you covered.
1. How to set up AirDrop on iPhone and iPad:
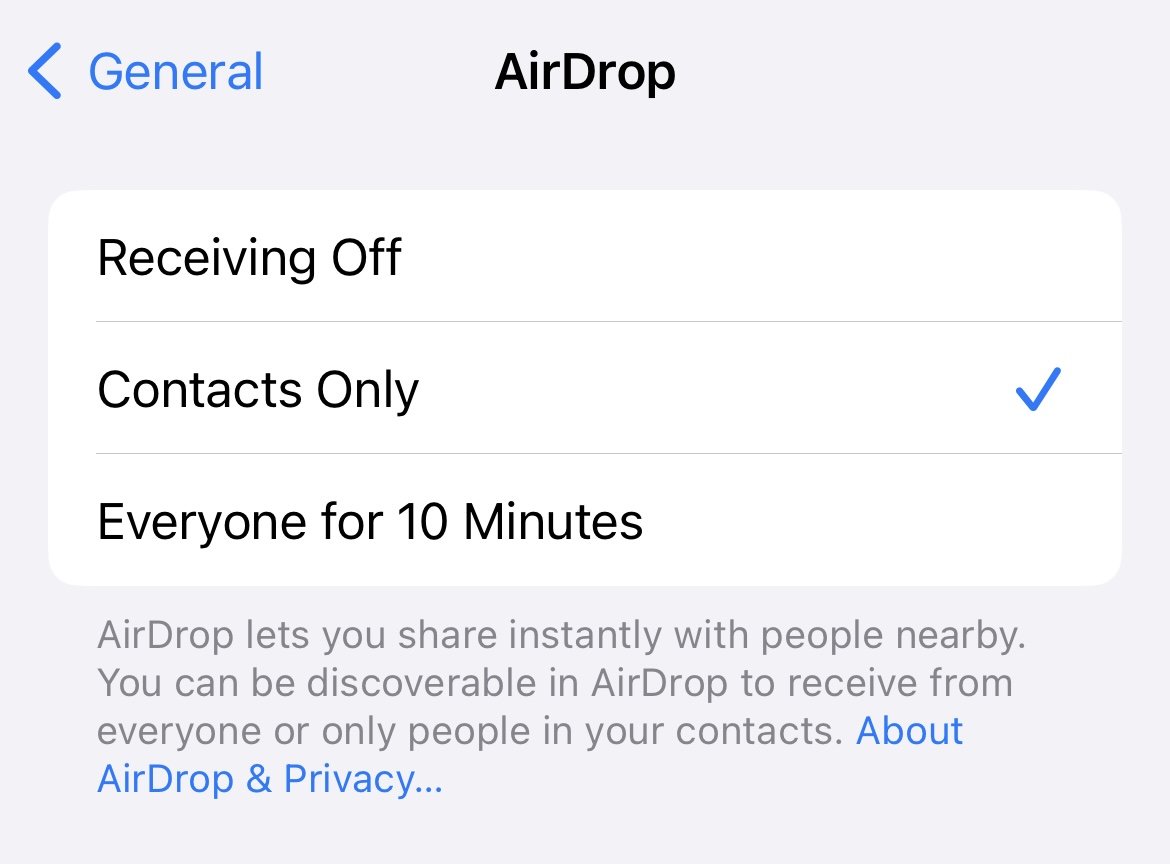
Setting up AirDrop on an iPhone or iPad is pretty straightforward. What you should do is head over to the Settings app, tap on “General”, then select “AirDrop”, then choose who you want to be able to share files with – either “Contacts Only” or “Everyone”. That’s it!
1. Open the Settings app on your iPhone/iPad.
2. Scroll down and tap on “General.”
3. Select “AirDrop” from the options.
4. Choose “Contacts Only” if you only want to share with people in your contacts.
5. Or pick “Everyone” to make your device visible to any Apple user nearby.
6. Make sure Bluetooth and Wi-Fi are turned on for AirDrop to work.
2. How to set up AirDrop on a Macbook:
Setting up AirDrop on a MacBook is simple. Open a Finder window, click on “AirDrop” in the sidebar, then choose whether you want your MacBook to be visible to “Contacts Only” or “Everyone”.

1. Open a new Finder window
2. Look for “AirDrop” in the sidebar on the left
3. Click on the “AirDrop” icon to open it
4. You’ll see two options; “Contacts Only” and “Everyone.”
5. Pick “Contacts Only” to remain visible just to your contacts.
6. Or select “Everyone” if you’re open to sharing with anyone nearby.
7. Make sure both Bluetooth and Wi-Fi are enabled.
How To Transfer Files Using Airdrop On Your Apple Device
Now that you’ve set up AirDrop on your devices (whether iPhone, iPad, or Mac), transferring files is a total breeze. Simply select what you want to share, choose the recipient, and hit send – the content will beam over in seconds! Let me walk you through the specifics for different Apple device combinations.
1. From iPhone/iPad to iPhone/iPad:
Sharing files between two iOS devices, such as iPhones or iPads, is really easy. Just find the photo, document, or item you want to send, tap the Share button, choose AirDrop, and select the recipient device.
1. Open the Photos, Files, or other app with the content to share.
2. Tap the Share button (the rectangle with the upward arrow).
3. Select AirDrop from the share sheet.
4. Any nearby AirDrop users will pop up – pick the recipient.
5. Tap Done, and the file transfers begin.
2. From iPhone/iPad to Mac:
Transferring files from your iPhone or iPad to a Mac is a breeze. Start by selecting the item you want to share on your iOS device. Tap the Share button, choose AirDrop, and then select your Mac from the list of available devices.
1. Open the app with the file(s) to share on your iPhone/iPad.
2. Tap the Share button.
3. Select AirDrop and look for your Mac in the visible devices.
4. Click on your Mac’s icon.
5. The file will automatically transfer to your Mac’s desktop.
3. From Mac to iPhone/iPad:
To go the other way and share something from your Mac to an iPhone or iPad, it’s just a couple of clicks. Locate the file in a Finder window, drag and drop it onto the recipient’s icon in the AirDrop window.
1. Open a new Finder window on your Mac.
2. Navigate to the file(s) you want to share.
3. Click on AirDrop in the sidebar.
4. Drag and drop the file(s) onto the iPhone/iPad icon.
5. Accept the transfer on your iOS device, and it’s done!
4. From Mac to Mac:
Sharing between two Macs is virtually seamless. Open a Finder window, locate AirDrop in the sidebar, then drag and drop any files or folders you want to send onto the other user’s icon.
1. Open a Finder window on the sending Mac.
2. Click on AirDrop in the sidebar.
3. Any nearby Macs will show up – find the recipient.
4. Drag and drop the file(s)/folder(s) onto their icon.
5. The transfer will start automatically and be completed quickly.
Frequently Asked Questions About Transferring Files On Apple Device
1. What Devices Are Compatible With Airdrop?
AirDrop is compatible with a wide range of Apple devices. For iOS and iPadOS devices, AirDrop works with iPhone 5 and later, and iPad 4th generation and later. For Mac, AirDrop is compatible with models released in 2012 or later that run OS X Yosemite or later.
2. Why Can’t I See The Other Device In Airdrop?
Double-check that both gadgets have AirDrop enabled to receive files from “Contacts Only” or “Everyone.” Ensure Bluetooth and Wi-Fi are on, too. If not, just restart the devices – that usually does the trick.
3. How Do I Airdrop Between Two Apple Devices?
It’s simple! Find what you want to share, tap or click the Share button, select AirDrop, and pick the recipient device. Boom—the file is sent!
4. Can I Use Airdrop With Non-Apple Devices?
Sadly, no. AirDrop is an Apple-exclusive file transfer feature for their ecosystem of iPhones, iPads and Macs only. No mixing with Windows PCs or Android devices here.
5. What Are Some Alternatives To Airdrop For Sharing Files?
While AirDrop is a gem for Apple users, it’s not the only fish in the sea. If you want to share files across different devices, you can try using email (old school, but it works) or cloud storage like Dropbox for bigger transfers. Messaging apps like WhatsApp or Telegram can also handle file-sharing too.
6. Where Can I Buy Apple Devices In Nigeria And Ghana?
You can buy Apple devices in Nigeria and Ghana through Cardtonic. Cardtonic offers a wide range of Apple products, including MacBooks, iPhones iPads, and Apple Watches, all at competitive prices.
Conclusion
AirDrop is a game-changer for sharing files across your Apple gadgets. No more tangled cables or dealing with complicated cloud storage – just a few taps, and you’re beaming photos, docs, and more between your iPhone, iPad, and Mac.
Once you’ve got the hang of it, you’ll wonder how you ever managed without it. Remember those days of pulling your hair out, trying to email massive photo albums or wrestling with clunky file-sharing apps? Yeah, those are history now. It’s like Apple waved a magic wand and made sharing stuff between devices ridiculously easy.
So go ahead and embrace the AirDrop life. You’ll save so much time and hassle you might actually get to enjoy your coffee while it’s still hot.